Showing posts with label how. Show all posts

Thursday, July 31, 2014

How to Choose a Gaming Laptop

Laptops traditionally have been a no go area for gamers. However, in recent years times have changed, from a business man play toy in the 1990s the next generation of gaming laptops have the raw power to cope with the most hungry of 3d gaming and graphic intensive software applications.
With the obvious advantage of unique portability the gaming laptop is certain to gain a big slice in the gaming hardware market in the next few years with many PC users opting for a more versatile approach to playing PC games and the booming market of online games. Technology is changing even month by month but by reading the guide you should be able to grasp the basic understanding of what you should be looking for when choosing a gaming laptop.

Processor Power
The engine of any laptop. The processor or CPU is one of the most vital components of a gaming laptop and you should be looking for a duel core processor, expensive yes but will stand you in good stead in the forthcoming months. If you cannot afford a duel core then a minimum of a 1.8mhz processor is what you should be looking at.

Random Access Memory (RAM)
Often overlooked and forgotten about, RAM combined with the processor is pivotal in a gaming laptop. The bottom line is if you have a cutting edge CPU but only 256mb of RAM or even 512mb then you are seriously limiting your gaming laptop performance. Go for at least 1mb of RAM and even better for the all important frames per second count get 2mb.

Graphics Card
This is where you have a decision to make. The big difference between a laptop and a desktop PC is the upgrade ability of your graphics card. In your desktop it is easy to upgrade your video card but inside a laptop it is difficult and often needs a pc engineer to carry out this process. Most standard laptops come with a onboard graphics card and you must expect to pay for a top end card such as a Radeon or Geforce.

Screen Clarity
Wide screen is recommended for gamers but do not compromise on screen quality. 17inch screen will help with those long gaming sessions and a good tip for when you are looking at laptops is to use the machine for a few minutes to see if your comfortable with the clarity and image quality of the laptop screen.

Battery Life
With raw graphic power busting out of your laptop you will need make sure your battery is up to the job. Lithium-ion battery that lasts up to 5 to 6 hours is ideal if your are looking to use your machine away from a wired power source.

Gaming laptop prices
Expensive. There is no point hiding this fact, if you compromise on CPU, RAM or video card then you will not have a gaming laptop at all, just a regular laptop with some costly components inside. Expect to pay nearly a third more for your gaming laptop compared to a normal spec machine.

Source: Free Articles


Read More..

Monday, July 28, 2014

How To Optimize Your Laptop Battery

Now the main problem which comes with most of the laptop users is of the battery backups that it provides. Many of the laptops which are in the market are good enough to provide you with the maximum battery life but this is not so with most of the brands. Usually they provide a bit lower battery backups than the rated ones. Now what to do to have an optimum backup for your battery. Here are some of the basic things or tips which you should follow in order to make your battery give you with the most backup time.

1.

First of all go for the proper checkup or the life of the battery. This can be done by having software installed on your laptop which constantly monitors your battery and provides you the feedback. Most of these softwares are freeware or are incorporated with the factory setup disk. This will help you in having a proper check of your battery life if it is delivering the right power or not.

2.

Never try to manually remove and short the battery ends. This will make your battery discharge totally at one time leaving the battery damaged casing a severe discharge. This is the most dangerous conditions and must be avoided.

3.

Never always discharge the battery before plugging in the power supply because this will lower the battery life as well. Discharging it completely and then charging it must always be avoided.

4.

The next thing one could do in order to save a lot of battery power is to go for Hibernate option for the laptop. This is most useful for the Laptop in case of battery saving techniques.

Always follow the above mentioned techniques so as to make your laptop work very well giving you the maximum battery backup having the most life of the battery as well.

Victor Pradel is the administrator of The Laptop Support Community, where you can find many useful content about laptop help , troubleshooting and repairing.

Article Source: http://EzineArticles.com/?expert=Victor_Pradel
Read More..

Saturday, July 26, 2014

How To Protect And Beautify Your Laptop

Getting a laptop can be a rather big investment and after sinking your money to invest in a laptop, I am sure you will want to protect it from scratches and other forms of damages.

Fortunately, there is a cheap and great way to invest in the protection of your new and old laptop:

By investing in a good laptop skin.

A laptop skin is a decorative piece of vinyl with an underlying adhesive layer. The adhesive layer ensures that the laptop skin stays fastened onto the laptop cover. A good adhesive layer will usually allow for easy and clean removal of the laptop skin from the surface of your laptop.

In general, laptop skins have good scratch resistance qualities making them ideal for protecting your laptop from fresh scratches. They come in different finishes, with lamination and varnish being the most common finishes.

Also, because of the injection of certain chemicals, some high quality laptop skins can even withstand extreme heat and cold, radiation and chemical corrosion. They are even resistant to tear, water and sunlight-fade.

Good quality laptop skins typically employ the latest in high resolution image technology to render photo-realistic image quality and exceptional color density, therefore you can not only protect your laptop but also beautify it. Imagine being the envy of all the on-lookers when you are using your chic-looking laptop with a great-looking laptop skin on your laptop.

Laptop skins sold in the market typically only cover the laptop cover while protective keyboard covers are sold separately. Also, do note that the lamination layer in some lousy quality laptop skins may come off within 6 months. Therefore, it always pays to invest in a good quality laptop skins such as garskins.

If you are looking to protect your laptop or give it a new look, www.GarSkins.com provides great laptop skins for both your laptop exterior and your internal keyboard for only one affordable price.

Donald Lim is the technology editor at Nu Edge Technologies. He is also an Internet Marketing Coach who owns countless web sites such as SecretsOfAchievers.com, InternetIdiot.com etc. You can subscribe to his free newsletters at http://www.donaldlim.com

Article Source: http://EzineArticles.com/?expert=Donald_Lim

Read More..

Friday, July 18, 2014

How to fix video problem on HP laptops

How to fix video problem on HP laptops:
In this post I explain how you can fix a known video problem on some HP laptops without actually taking it apart. Most likely the fix is not permanent but this will buy you some time, enough to backup personal files or even use the laptop until you get a new one. There is no guaranty this fix work 100%.
Here are some HP models affected by this known video failure problem: HP Pavilion dv2000, dv6000, dv9000, tx1000 tablet PC, Compaq 700, v3000, v6000 and probably some others.
If you know more models, please mention them in comments after this post.

CAUSE OF THE PROBLEM:
As I know, the video problem somehow related to NVIDIA chip located on the motherboard. Overtime the NVIDIA chip separates from the motherboard and the laptop video fails.


SYMPTOMS OF THE PROBLEM:
When you turn on the laptop, all LEDs light up but there is no video on the laptop screen or external monitor. The laptop screen remains completely black and blank. The cooling fan spins as normal, on some models it stars spinning right away on other models after some time.
I found this trick mentioned by Walliot (comment 85) in this post. This trick called “towel fix” and used to fix “no video” issue in xbox360.
HOW TO FIX:
1. Remove laptop battery and hard drive.

2. Plug the AC adapter and turn on the laptop. Make sure the laptop is actually on, all LEDs should work.

3. Wrap the laptop with towels so all air intakes are closed.

4. Keeps the laptop wrapped in the towel for about one hours.

5. Unplug the AC adapter from the wall the let the laptop cool down (do not touch it for a while).

6. Unwrap the laptop and try tuning it on.
I didn’t really believe that this trick might work and tried it just because of curiosity but… IT WORKED!!!!
LAPTOP #1. HP tx1000 Tablet PC.

First, I tried this fix on a failed HP tx1000 Tablet PC.

I didn’t have paper towels at work but I had plenty of bubble wrap.

I closed the laptop in a tablet mode (with hard drive and battery removed), plugged the AC adapter and wrapped the laptop properly in bubble wrap.

After that I just waited for about two hours and unplugged AC adapter from the wall.

Waited for about 30 minutes and tried turning it on.

Success!!! The laptop started with video.

I just couldn’t stop and tried the fix on another failed laptop.
LAPTOP #2. HP Pavilion dv6000.

This is a different model with very similar failure symptoms. It turns on, all LED lights work but there is no video.
This time I didn’t something extra. To make sure there is no cool air coming into the laptop though bubble wrap, I closed all air vents with sticky tape.

After that I turned on the laptop from AC adapter (again with hard drive and battery removed) and wrapped the laptop base with bubble wrap.

The laptop was running like that for about 60-70 minutes but then I noticed that all LED lights went off. Not sure what happened, maybe the laptop overheated too much and shut down on its own. Anyway, I didn’t touch it for about 30 minutes and let it cool down.
My fix was successful again! The laptop turned on with video and booted to the desktop.

HOW THIS FIX WORKS:
Here’s my understanding of how this fix works.

When you run a laptop wrapped in towels (bubble wrap in my case), it gets very hot because there is no air circulation inside the heatsink. The heatsink and GPU (NVIDIA chip) run so hot that it melt solder between the chip and motherboard and the video chip gets resoldered to the motherboard.
Now I have to test for how long this fix last. :)
RELATED POSTS:
In one of the previous posts I explained how I fixed failed video chip by backing the motherboard in an oven.

In one of the following posts I explain how to reflow failed NVIDIA graphics chip with a heat gun.
Read More..

Thursday, July 17, 2014

How to reset Canon MP258

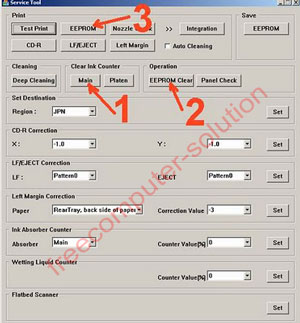
In previous post I wrote how to fix error 5200 on IP2770 and now I want to share how to reset printer canon MP258. Indications that appeared first is "Absorb Full" and error code "P07" on LCD Panel. To solve that problem you may need to try these steps below :
  1. Turn the printer off and let power cable plugged
  2. Press and hold stop/reset button, then press and hold power button too
  3. Keep pressing power button, then release stop/reset button, press stop/reset twice in the state of the power button is pressed
  4. Release power button and stop/reset simultaneously
  5. The printer will proceed a while,  then on LCD Panel will appear "0"
  6. Computer will detect new device but just ignore it
  7. This situation shows the printer in service mode and ready to be reset 
Download the software resetter mp258, by clicking here


  1. Enter two sheets of paper
  2. Run Canon MP258 Resetter
  3. Click "MAIN" then the printer will proceed, MP258 will print one sheet
  4. Click "EEPROM CLEAR"
  5. Then Click "EEPROM" and the printer will print the result of MP258 reset
  6. Turn the printer off by clicking Power button
  7. The printer is ready to work again
That is tutorial from me, good luck and hopefully useful....
    Read More..

    Laptop is dead How to troubleshoot the problem

    Laptop is dead. How to troubleshoot the problem.:
    In this post I’ll explain how to troubleshoot a dead laptop and find the problem. The following troubleshooting tips are not model and brand specific, they should work for most laptops.
    Let’s take a look at two different scenarios.
    Example 1. The laptop is absolutely dead.

    When you plug in the power adapter and press on the power button, there is no signs of life at all. The laptop will not make usual noises, LEDs will not light up, the fan will not spin, the screen is blank and black, etc… In short, the laptop is dead.
    What you can do in this case?

    1. Make sure the wall outlet is working and the laptop DC adapter is getting power from the outlet. Try another wall outlet.

    2. Test the laptop DC power adapter, make sure the voltage output is correct. You can test the DC power adapter with a voltmeter.

    3. Let’s say the DC adapter is fine and the adapter outputs correct voltage. In this case unplug the power adapter from the laptop, remove the battery, wait for 1-2 minutes, plug in the adapter and try turning on the laptop again.
    OK, you tested the adapter and it’s bad. If you decide to replace the original DC adapter with a generic one, you’ll have to follow this rule:

    The voltage output on your new adapter has to be exactly the same as on the original adapter. The amperage on the new adapter could be the same or higher.
    If nothing helps and the laptop is still dead, apparently the motherboard is fried or there is a problem with the DC power jack. It’s possible the DC power jack is broken and the motherboard is not getting any power from the adapter. In this case you’ll have to disassemble the laptop and replace the power jack. Check out this guide for fixing laptop power jack.
    Example 2. When you plug the DC power adapter and press on the power button, the laptop starts making normal noises, the LEDs work properly but noting appears on the screen. The laptop will not start.
    Troubleshoot dead laptop


    First of all, take a closer look at the LCD screen. Look at the screen under bright light. It’s possible that the image is still on the screen but it’s very faint. If that’s the case, check out these tips for troubleshooting laptop with backlight failure.
    Connect external monitor
    If there is no image on the laptop LCD screen, test the laptop with an external monitor. Connect an external monitor to the VGA port on your laptop and turn the laptop on. You can toggle video output between the internal LCD screen and external monitor by pressing Fn and F4 keys simultaneously on HP laptops, Fn and F5 keys on Toshiba laptops, Fn and F7 keys on IBM laptops. Other laptops may use different key combinations.
    Let’s say the external monitor works fine but the internal LCD screen has no image at all. If that’s the case, your problem could be related to the LCD screen or the video cable. Also, make sure the video cable makes good connection with the motherboard and the LCD screen. Try reconnecting, reseating the cable.
    Test external video
    In my case, both internal and external monitors were absolutely dead. Neither of them had image. That means the problem is not related to the LCD screen or the video cable. From my experience I know that this problem could be related to the laptop memory.
    Replace reseat memory module
    Try reseating the memory module, maybe it’s not making good connection with the memory slot. Try cleaning contacts on the memory module with pen eraser. Try moving the memory module into another slot. Try replacing the memory module with another known good module, it’s possible that your original module is dead.

    If you have two memory modules installed you can try removing them one by one, it’s possible that one of the modules is bad. Try installing different memory modules into different memory slots.
    In my case reseating, swapping the memory module didn’t help. I was pretty confident that my problem is not memory related and I moved on.
    Remove hard drive DVD drive
    Try removing battery, hard drive and DVD drive and turning on the laptop without these components.
    Disconnect display
    Also, try turning on the laptop with an external monitor when the video cable is unplugged from the motherboard. If the laptop start with video on the external monitor, apparently there is something wrong with the laptop display panel.
    Remove laptop components
    In my case removing the hard drive and DVD drive didn’t help. Unplugging the video cable didn’t help either.

    I continued taking my laptop apart piece by piece and tested it after each step.

    I removed wireless card, modem, disconnected the keyboard but it didn’t help.
    Test laptop with external monitor
    I still wasn’t able to boot the laptop with video on the external monitor.
    Disassemble laptop
    Finally, I disassembled the laptop and removed the motherboard.
    Test laptop motherboard
    On this picture you see my final test. The motherboard has been removed from the base and I assembled basic barebone system on my bench.

    1. Motherboard. Like on most laptops, in my case the video card is integrated into the motherboard

    2. CPU with heatsink and cooling fan.

    3. Known good memory module.

    4. The power button board witch I need to turn on the system.

    5. Working DC power adapter.
    Still cannot get any video on the external monitor. The system turns on, the cooling fan starts spinning but there is no video.
    At this point I’m 95% sure that the motherboard is dead. CPU failures are not very common, so it must be bad motherboard.
    Read More..

    Monday, July 14, 2014

    How To Check Laptop PC Hardware ID

    1) What is Hardware ID???
        Ans : Its the Hardware Identification Number.
                 Its unique and specific for that model only.

    2) Why should we even bother to check the hardware ID???
         Ans : Because, Hardware ID can determine which
         driver we need to install in order to make that
         hardware running.

    How to check??? 

    Note: This guide is made under Windows 7 OS. Should be the same with Win XP OS.

    Procedure
    Open Device Manager (Windows Button + R) then type "devmgmt.msc" and press Enter. You should see Device Manager Windows as shown below.


    Follow screenshot below to check Hardware ID.


    Hope This Helps!

    Popular Post :
    Fix Not Responding Mozilla Firefox.
    DriverMax 5.0 Full Installation (Find and download driver for your machine).
    Error Code 43 Solution
    Error Code 10 Solution
    Acer Aspire 5100 Windows XP Driver
    Read More..

    Sunday, July 13, 2014

    Spilled Water On Laptop How To Clean It

    Spilled water on laptop, how to clean it, when you spill water or a liquid on your laptop, the first step is to stop using the laptop immediately. Turn off the laptop, unplug the power adapter and remove the battery. The laptop should be disassembled as soon as possible and all internal parts should be inspected for liquid damage. Water or liquid spills on laptop can be very devastating and is capable of causing extensive damage to the laptop. For a step by step guide on how to take apart or disassemble a laptop click here. Take the following steps to solve the problem.

    Step 1
    Now remove the keyboard and take a closer look underneath it and search for water or liquid spills.

    Step 2
    Also check the motherboard for water or liquid spills.

    Step 3
    If there is liquid spill on the keyboard or motherboard, get a clean soft cloth and wipe the liquid spill on the keyboard and motherboard, when wiping the motherboard you have to be very careful to avoid damaging very small components on the board.

    Step 4
    If you find any corrosion on the motherboard, you can clean it with a toothbrush and 91%-99% isopropyl alcohol.

    Step 5
    Ensure that the motherboard and all the internal component of the laptop is completely dry before testing it.

    Step 6
    When the laptop has been confirmed to be in good working condition, follow the same process to assemble the laptop back.

    Read More..
     
    Notebook Info - Powered By Blogger